When I was
a young girl, I had a teacher who told me to always date and sign all my school
papers. At the time I didn’t understand fully what he meant, but now that I
have lived a good four decades, I have come to realize that I do not always
remember when I wrote, (or created) something and this is when the wisdom of my
old teacher comes back to memory. You date your papers so that you remember
when you wrote them, and you sign them to confirm that it was you who wrote it.
Now this
should also apply to items you create, draw, paint or sew. Naturally it is
easier to sign a piece of paper than an item, but signing and dating it can
make all the difference later, and if nothing else, it will help you keep track
of the evolution of your skill.
Earlier on
this summer I took a little trip to Scotland to visit my sister, my plane
arrived at Aberdeen and there we passed by a little charity book shop where I
found a few small treasures including a vintage embroidery book by Mary Thomas.
Inside the
book there is a section for ‘Technical and miscellaneous hints’, and to
my pleasant surprise I saw a paragraph that expressed beautifully what I have said
regarding the importance of signing and dating your embroidery projects.
“The old custom of signing and dating any
elaborate piece of embroidery, with the idea that it should last, has now
happily been revived. A signature may seem of no particular consequence to the
worker, but it adds greatly to the personal charm and interest of the work,
which later may be handed down with pride from generation to generation.”
Like most needlework interested persons, I
have far too many UFO’s (UnFinished Objects). Such as the sweater I started
knitting a year ago, the large sampler that has sat on my desk for a couple
years, and ‘shame, shame, shame’, a glorious cross stitch picture from Lavender
& lace which I started over a decade ago and never got around to
finishing.
With a full time job, and studying (almost
finished though), I have found that 24 hours days are just too short for doing
all that one needs, and wants to do. That is why a little while back I started
on a spot sampler. When the need-to-stitch starts to itch my fingers, I can
stitch a small motif and not feel guilty for not completing a large project. I
would definitely recommend it to others who like to embroider, but don’t have
much time.
The newest addition is a little anchor
pattern, re-charted from an antique bookmark in my private collection. The
anchor was stitched in cross stitch on punched paper, then sewed on a
decorative ribbon.
I stitched the flowers in petit point, and the rest in cross stitch.
The pattern is available on the website, and for those who are curious, here are
the colours I used:
DMC 3346 – Medium green
DMC 3348 – Light green
DMC 3328 – Medium pink
DMC 776 – Light pink
DMC 3371 – Dark brown
DMC 801 – Medium brown
Antique punch paper and ribbon bookmark
In the Victorian era, an anchor was a symbol of hope and was often
paired with a
heart, and cross to symbolizes Faith, Hope, Love.
“And now these three remain: faith, hope and love.
But the greatest of these is love!”
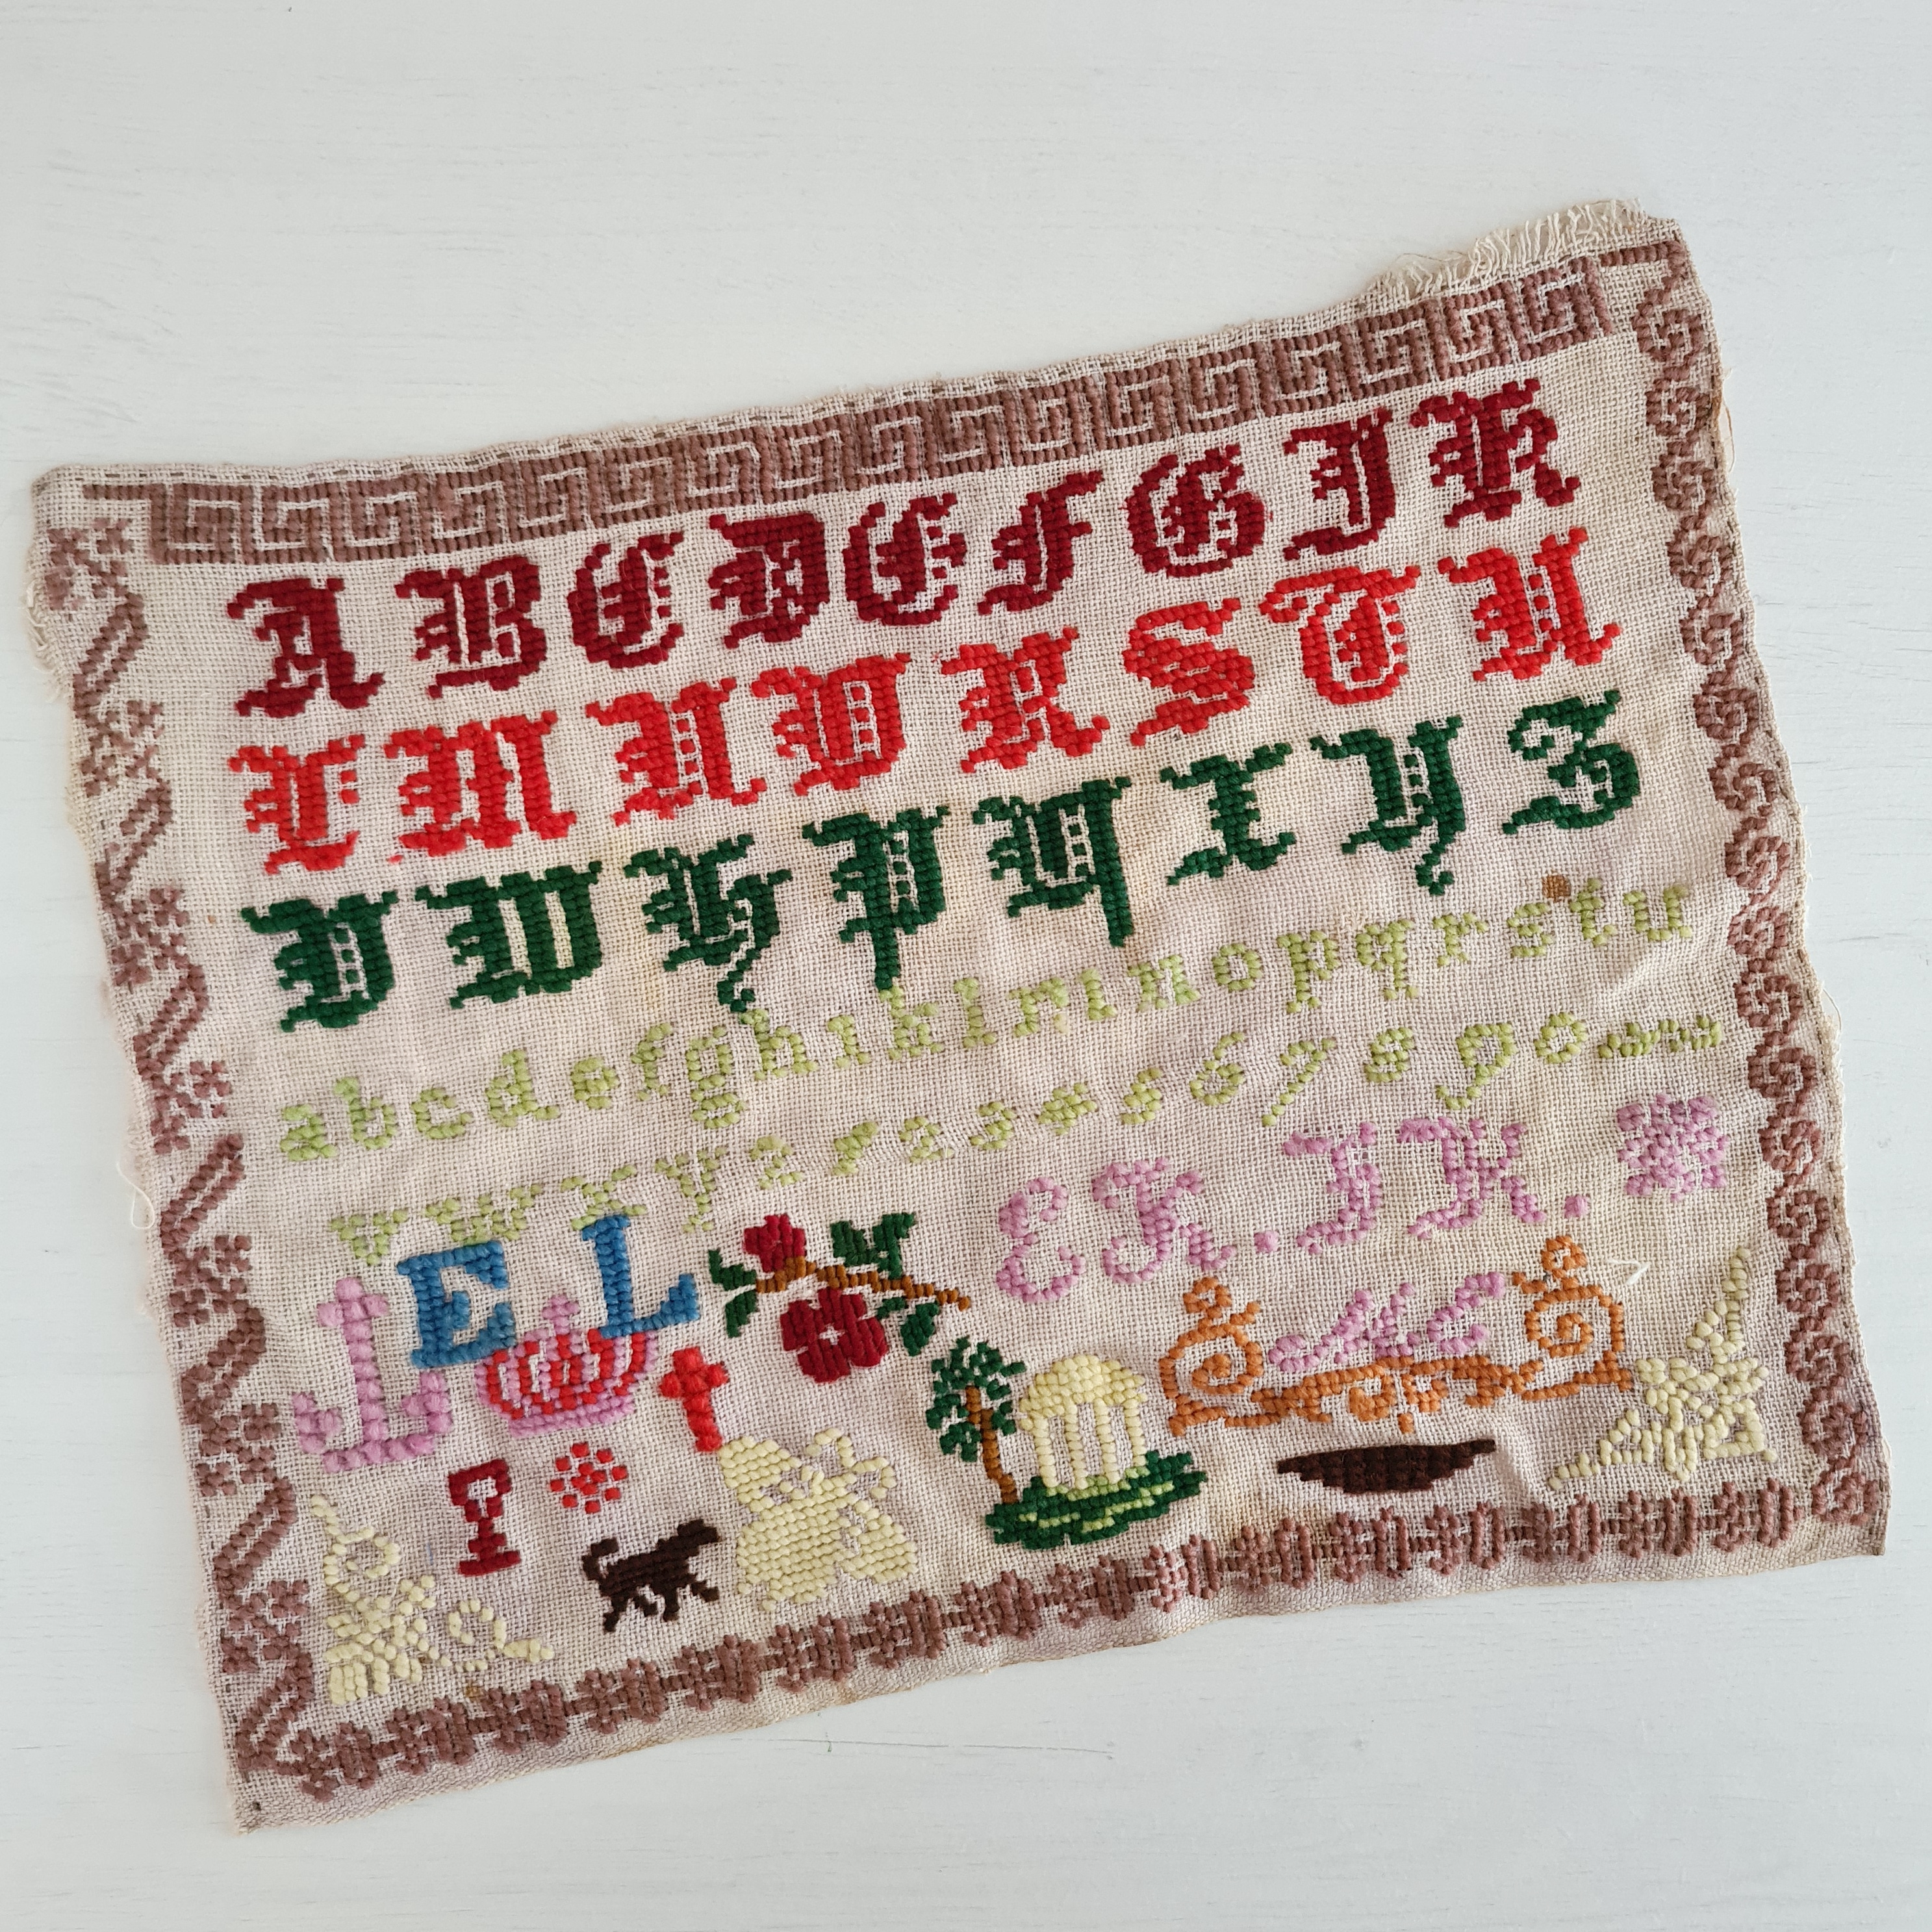
This colorful sampler is worked mostly in cross stitch, but with some
motifs in double cross stitch, and a long cross stitch basket (?) under
the main initial. It is undated, though most probably dating from the
second half of the 1800’s.
Along with the classic uppercase, and lowercase alphabet and numerals,
the sampler also has four decorative border strips and several little motifs
which could be used for other projects too. Note the large, yellow bee
(bumblebee)
I named it the M.E. sampler, because those were the prominent initials. One
more reason to date and sign your needlework, imagine a collector finding your
piece a hundred years from now and trying to figure out the date it was made
and by whom.
With little fading, the back and the front has just as crisp colors
The pattern is available on ETSY, and the website.
As a collector at times, you come across similar, though
not entirely identical items, this is the case with four small school samplers
I recently acquired. Two of them were stitched eleven years apart by girls sharing
a similar last name (Stavern), the other two are practically identical, but were
worked four years apart at two different schools.
This makes me wonder if this was the standard form for school
samplers of the time, or if the teacher was the same for both young girls, and as
for the two near identical samplers, if there also it was the case of the same
teacher relocating to a different school? These theories make for some fun speculations.
The samplers are very simple, just an alphabet in
different stitches, and a set of numerals. The letter J is missing in three of
the samplers, but Helen’s 1905 sampler has both the J, an extra half
alphabet in Algerian eye and no numerals, all samplers have the letters Æ, Ø.
The cross stitch and Algerian eyes are stitched in red,
the straight Gobelin stitches are white, blue or yellow. Three of the samplers have a simple blanket
stitch around the edge, the last one is stitched within the woven frame of the
cloth.
If you want to try your hand at a stitching a
historical sampler reproduction, these would make the perfect project. Simple, but
with three different stitch types, plus the blanket stitch edge.
Another possibility is to select your favorite version
of the alphabet and numerals and create your own sampler, using the colors of
your choice. Because of the specialty stitches the samplers must be stitched on
an evenweave fabric; look closely at the details photos for ideas of which material to use.
The samplers are available as a set of 4x here: ETSY, Website
Close up of the details - Note the neat blanket stitch
Imagine being invited to spend the night in a simple,
but comfortable guest room, antique furniture, some well read books, and on the
night stand an old jug filled with freshly picked wild flowers. Hanging on one
of the walls is a framed cross stitch embroidery, stitched in colorful wool on
a now faded evenweave, it features a serene, peaceful poem……
I don’t know where this vintage embroidery came from, and
whether or not it was ever hanging on the wall of a guest room, but I do believe it was at one time framed. I cannot date it exactly, but it came
together with another, very similar embroidery featuring the hymn ‘If we could see
beyond today’ written by Norman J. Clayton and published in 1931, this leads me
to presume that it was stitched sometime after that date, and would thus be a
vintage and not an antique embroidery.
A little research let me to find the author of the
poem, it was written by Ellen Maria Huntington Gates (1835-1920). It seems our
stitcher changed some of the words, as most of the examples I found had a
slightly different wording.
This is a pretty little stitched ornament that is perfect for using
up leftover linen scraps and those variegated thread I know each of us
stitchers have tucked away in our stash, waiting for just that one ‘perfect’ project.
For the roll shown in the photos I used 28 ct linen, and about
one skein of DMC coloris 4519. If you are using 28 ct linen I would suggest
having a piece that is at least 18 x 12 cm. For stitching up I used a thin
crochet thread (100% mercerized cotton), you’ll want to use a good, sturdy
thread for the stitching up as there is a little bit of tension on the linen
when you fill the roll with polyester stuffing.
Start by stitching the cross-stitch design, then from
the sides count 5 stitches (10 threads) and pull out 2x thread. Now count 10
stiches (20 threads) and cut, finish off by unravelling about 4 threads.
Trim your embroidery to about 0.8cm/1cm, fold and
start sewing by weaving your needle between 2x threads – see photo.
I started stitching from the middle as this gave me the chance to finish
off the ends the way I wanted, but you can stitch it up as you prefer; take
extra time on the ends as this is what will give your ornament a nice, strong
finishing touch.
Stuff your little roll, and finish it off with a nice
ribbon, or yarn.
Stiching is finished, threads are pulled in the center, now unravel 4 threads on each sides
Close up of how the sides are stitched together
I stitched a little 'extra support' at the end of the roll to make sure the ends are strong and secure
A needleroll is really quite simply a decorative pin-cushion.
They are a great way to use up those little embroidery projects that you won’t come
around to framing, they make great gifts, and can be stitched and used as prize
for charity or fund-raising lotteries.
Any small embroidery project can be made into a needleroll,
there are no rules, so you can get quite creative with them. Here is my version
of a needleroll with antique hemstitch sides, if you don’t want to do the
hemstitch you can simply fray the linen, it will still be just as sweet and
attractive.
What makes needlerolls so dainty is the finishing touches, I
would recommend giving yourself plenty of time for the stitching together. The
needleroll must be stuffed quite firmly to get the nice, sausage shape, so make
sure to stitch tight and with a good strong thread in order to avoid it falling
apart at the seam later on.
After stitching the cross-stitch pattern, I trimmed the
linen to about 4 – 5 centimetres. Linen unravels easily, so I wanted plenty of
extra fabric while I worked the hemstitch border.
-From the pattern count 20 threads and pull 2
threads (or as many as needed to accommodate the size of your ribbon)
-- Count 20 threads again, and this time pull 3
threads.
-- Count 10 threads, and pull 1 thread.
Again, this was my personal preference since I had a
small piece of linen, you can make the sides longer if you wish.
- - Fold on the place where you pulled the single
thread, you decide how long the edge will be, then trim the fabric leaving enough
to have it folded inward too. If you find linen is hard to fold over, you can
iron it in place.
- - You can hem the sides at the same time as you
work the hemstitch, or hem it with small invisible stitches, then work the decorative
hemstitch.
-- Work the hemstitch on both sides.
- -
Now, trim carefully your embroidery to about 1.5
– 2 cm on the top and bottom.
- - Run a zig-zag stitch along the top and bottom
with your sewing machine, or work a quick blanket stitch as I did. This will
hold the linen fabric in place and keep it from unravelling.
- -
Fold over and stitch your needleroll together
with a solid thread. I used the same mercerised cotton I had used for the
hemstitch.
Here you can either turn it inside out and
stitch it, then turn it right side up. Or you can fold it over on the right
side and carefully stitch it together like I did- See photo.
A small tip: I sewed it from the middle
toward the sides in order to finish off on the sides, this gave me the chance
to give a bit more attention to the ends of the needleroll.
--Very carefully finish off the ends of the
needleroll, invest a few extra minutes and concentrate well to make the ends
neat, tidy and sturdy. You can always cheat a little and add a dab of glue
to hold the little threads in place.
-- Now the fun part! Run the ribbon of your
choice between the threads where you pulled 2 threads, tighten one end, fill
your needleroll with polyester fill, make it nice and compact in order to get a
good cylinder, sausage shape. Tighten the other ribbon, make a nice little bow,
trim excess ribbon if needed.
Your needleroll is finished !
One side done, and the other showing the pulled threads
Fold over the last pulled thread, trim and tuck the frabric ends before beginning on the hemstitch. You can iron the fold in place, or use pins.
Antique hemstitch over three threads. Step 1
Step 2
When you are done with the hemstitch, trim your embroidery to about 1.5 cm. You can do a quick blanket stitch around the sides to hold the linen in place, or use a sewing machine and zig-zag stitch.
I chose to simply stitch it along the sides, but you can just as well turn the needleroll inside out to stitch it together, then turn it right side out again. Use a good strong thread, like the one you used for the hemstitch.
This is where you have to pay attention and put in the extra minute or two. Here you can see how I finished off the sides of the needleroll, by carefully stitching the hems with invisible stitches. If you are scared it will enravel, you can always add a small drop of glue on the inside... no one will know.
Weave a thin ribbon on the first row of pulled stitches, then stuff with polyester fill. Tighten and finish with a neat bow.
The pattern in colour + black and white is available for free here: Free patterns
Here is a small film showing how I work the antique hemstitch, remember there is nothing wrong with stitching it over 2, 3 or more threads. I'm right handed so I work from left to right, if you are left handed you will get the same result if you stitch it from right to left.